Google+
Rip One Golf- Golf Instruction, Golf Coaching, Golf Classes and Golf Lessons in Austin, TX

Garry Rippy Golf offers golf lessons, golf coaching, golf instruction, golf classes and golf schools in Austin, TX. This blog contains golf instruction articles, golf tips and golf instruction videos by Garry Rippy, PGA.

Tuesday, November 2, 2010

Reach Your Full Potential with a Great Set Up!

What is the number one thing you can do today to improve your golf score?  Some would say "play or practice more" and others might say "hit it farther or straighter".  Both are great answers, but the truth is, the best thing you can do right now to lower your score is improve your set up!

If you look at any tour caliber player (male or female) you will notice they all look very similar in the set up position.  It's almost like they all read Golf 101 "The Set up".  But, as an instructor, a poor set up is the #1 issue I see among the majority of amateur players. 

A great set up will allow you to reach your full potential as a golfer!

To me, the proper set up is easy.  Follow these instructions to get the "feel" of an athletic set up:
1.  Without a club, I want you to stand erect with your feet shoulder width apart.
2.  Now raise your arms about shoulder height and place the palms of each hand together with the thumbs pointed up.  You have formed a triangle between the arms and shoulders.
3.  The goal is to now get the arms or triangle to hang in front of you.  To accomplish this first lower the arms until your chest stops them.  To get them to hang in front of you, bend from your hips as you let your shoulders drop forward.  Try to maintain a fairly straight but not stiff back as you do this.  When the arms are hanging straight down from your shoulders, this is where you stop.
4. Now put a small amount of bend in the knees, relax the arms and put your hands in a golf grip position.
5.  Your weight should be balanced left to right and back to front. 

After repeating this exercise a few times, have a club nearby and place it in your hands after completing the last step.  It won't be long until you can get in this athletic position every time with a club in your hands.


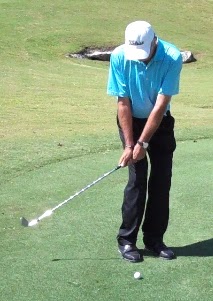
Here is a front view of the proper set up.  One thing to note is the position of the right knee.  Even though I am balanced, I do put a little pressure on the inside of the right foot to keep me centered over the ball on the backswing.  This move also allows me to turn and not sway on the backswing.  I do this by positioning my right knee about 3-4 inches inside my right foot.  Also, it is plain to see the "triangle" formed by my arms and shoulders. 


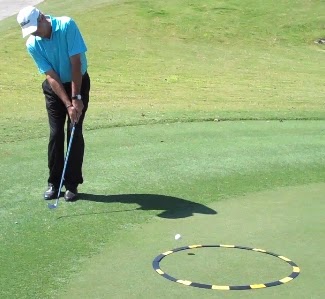
From a down the line look, it is plain to see my arms hanging from my shoulders.  Also, my head is in line with my spine and my chin is not buried in my chest.  My knees have a slight bend to them and they are just above my shoelaces.  It is not a coincidence the club is setting at 90 degrees to my spine.  If my hands were too high at address or above the green line, this would cause too much tightness in the wrists and prevent me from hinging my wrists properly at the top of the swing. 


I recommend to check your set up position in front of a full length mirror.  Once you associate the correct feel with the correct look, you will be able to duplicate your set up on the course.
Let's briefly look at how a good set up effects the swing.

A great set up allows me to turn to the top and maintain my original spine angle.

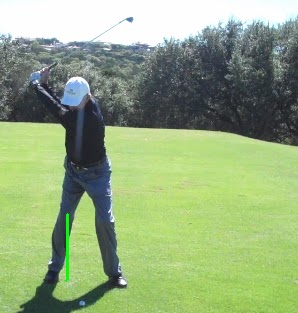
Note how my right knee stays braced, yet my hips have turned in the backswing.
This position produces power and accuracy!


At impact I have retained my original spine angle.  Since I turned
into the brace of my right leg, it is easy to get off my right side and onto my left through impact.
This is evident by the right heel releasing from the ground through the hitting area.


Tuesday, October 12, 2010

Chip Away Strokes the Easy Way!

Great chipping will save you many strokes a round.  The two components to great chipping are a sound mental approach and simple technique.  In my experience, most golfers are OK with the technique, but forget to prepare or focus on the shot at hand.  Your mental approach (preparation) should include choosing the correct club for the shot, picking a landing spot for your ball and then visualizing the ball rolling into the hole.

I think it is safe to say there are more golfers which use one favorite club for chipping and vary the length of swing depending on the length of the shot.  It is very difficult to be consistent using this technique as you are always changing the length of your swing and relying too much on feel.

 I am a proponent of landing the ball just onto the putting surface and then letting the loft of the club determine how far the ball rolls.  With this technique, you are always making the same length swing but varying the club you are using. 

I will get into more detail in a moment on the technique, but I will say at this point your chipping swing is always the same length.  With this fact in mind, there is a point when you are too far away from the green to chip the ball and get it to land on the green.  When you are at this point, the shot then becomes a pitch and run or a high lofted pitch shot.  We will discuss this in a future post.


When teaching, I use a target circle for the student to land the ball.  It does not take long for the student to land every shot into the circle.  This circle is about the size of a hula hoop.  The bottom line is you are trying to land the ball about 5-6' onto the green.

Now, how do you decide which club to use?  I figure the distance from my ball to the circle is one "part".  This part may be anywhere from 2-6 yards from the edge of the green.  I also call this part "air time" as it is the distance the ball travels in the air before hitting the green and then rolling, which is called "ground time".  If the hole is close to you, there will not be much ground time so you will use a more lofted club.  If the hole is further away, there will be more roll or ground time and you will use a less lofted club.  If you will practice landing the ball just onto the green and varing your club choice, it will not take long to figure out how far each club rolls.  But, you must be hitting crisp shots to be consistent.

Again, the proper mental preparation is choose the correct club, pick a landing spot for the ball, then visualize the ball going into the hole.

Now, more detail about a simple technique I use and teach.

Set Up
1.  Grip down to the bottom of the grip
2.  Feet close together and aimed slightly left of the target
3.  Since you have gripped down about 2-3 inches, add that much knee flex
4.  Hands should be positioned ahead of the ball and the ball will be located off the big toe of your back foot
5.  Your weight should be more on the front foot


Backswing
 
1.  Swing the arms just past your back leg
2.  There is no independent hand action or weight shift


Impact
1. Return to set up position with hands leading the club


Finish
1.  Club stays low to the ground
2.  Your head stays down too
3.  The club head does not pass the hands
4.  The follow through is the same length as the backswing


I think you will find this technique simple and easy to repeat.  Any golfer, regardless skill level can learn to lower their scores by following this technique and applying the proper mental approach.

Friday, September 17, 2010

Slow Play can be Eliminated!

I had a question from one of my students regarding slow play.  She said she gets frustrated when waiting for her playing partners to hit and wanted to know how to get them to play faster without hurting their feelings.

I thought it was a great question and I wanted to share my answer with all.

It just so happens I am known as a fast player in my PGA Section.  Not long ago, in an event I was competing, one of my fellow competitors was fast like me, and the other was a little slower.  At the completion of the round, the slower player exclaimed "I felt like I was sprinting to keep up with you guys today"!  I laughed and informed him I go by the theory of "hit it and get it".  It is not we were rude to the third player, we just went about our business in a brisk manner. 

Back to the answer regarding slow play, I find if I drive the cart I have some control of the pace of play.  I try to set the example for a quicker pace.  Here are a few more suggestions which might help all golfers play faster.

Here is a picture of my favorite headcover.

1.  Announce on the first tee "let's play ready golf today", which simply means whomever gets to their shot or the next tee first goes ahead and tees off.  Disregard honors.

2.  When approaching the green of the hole your are playing, always park the cart on the cart path either to the side of the green of behind the green.  In other words, do not park the cart in a place which you have to walk back to the cart toward the fairway and hold up the group behind you.

3.  Write the scores down at the tee of the next hole while the others are hitting, not when you are still sitting in the cart by the green of the hole you just played.

4.  If you have to take a practice swing, just make it one swing, not two or more!  I have timed rounds in which one or more players take practice swings before each shot.  This adds anywhere from 10-20 minutes to the round.

5.  Standing over the ball too long really slows play down.  You should not have a grocery list of swing thoughts before you swing.  Going through this list causes "paralysis by analysis".

6.  When you arrive at the next tee, have your glove on and ball and tee in hand.  Do not wait until it's your turn to play and realize you are not ready.

7.  While the others in the group are hitting is the time to do all your pre-swing work.  This includes figuring yardage, deciding club choice or reading the green.

8.  If you are having trouble getting your headcover back on your driver, then do not fiddle with it.  Get back in the cart and put it on while driving to the next shot (my personal pet peeve).

9.  All players should watch each other's shots so balls which might be in deep rough, trees or hazards can be located quickly.

I am not advocating for golfers to sprint around the course mind you...just be ready to play when it's their turn!  This rule especially applies to tournament play.  Your pace should be the same for a casual round as it is for a tournament round.

If everyone would abide by these suggestions, slow play will be eliminated.

Friday, September 3, 2010

Why Can't I Take it From the Range to the Course?

I get this question quite a bit, and the simple answer is "practice like you play".

When practicing, I think it is safe to say that most golfers are more into quantity and not the quality of their sessions.  When you have the oversize bucket of practice balls before you, it is very easy just to pour out the entire container and start hitting.  When using this method of practice, I find there is no concern for target or consequences. 

This is not what I call "practice" but more of a waste of valuable time.  Ben Hogan once said he wished there were more hours in the day so he could practice more.  He felt if he missed one day of practice it would take him several more to make up for it.  I can promise you he never wasted a shot while practicing.  In the mid 1980's I was an assistant professional at Shady Oaks Country Club in Fort Worth, and Mr. Hogan was there every day practicing.  He would hits balls for hours at a time to a forecaddie.  The forecaddie was his target and he knew the exact yardage he hit every shot.  Now, we all do not have this amount of time to practice, nor are we headed to the PGA TOUR, but we need to utilize the time to our best interest.

I recommend you take out one ball at a time and focus on each shot.  This is how you do it on the course, right?  I find most golfers just hit to the big expanse of the range and do not get precise enough.  Pick your target, use your swing thought, and then hit the shot.  Watch the shot to completion even if you mis-hit it.  If you hit it great, you want to enjoy it and put that feel in your memory bank.  If you mis-hit it, then you need to be aware of your balance and tempo.  Usually these are the causes of bad shots.  If you are working on a particular part of your swing, use a mid iron to perfect the move.  I would not stand there with a driver when trying to incorporate changes in your swing.   If you are working on a particular swing thought, then focus on this thought and stop trying 4-5 other things.  If your mind gets too busy you will start hitting balls too fast and then you are not learning. 

Once you feel you are hitting the ball well, try playing a round of golf on the practice tee.  Imagine you are playing your home course and start with your tee shot on #1.  Just hit each shot you think you would hit for each full shot and play all 18 holes.  For example, if #3 is a par 3, then tee up a ball and use the club you would normally use.  Pick out a target at the correct yardage and imagine the green with surrounding bunkers or water.  In other words, set up some consequences for the shot.  If you do this, you will really start focusing better on each ball, and not just banging balls.  If #4 is a long par 5 and you hook your drive, then practice the recovery shot you would be hitting on the course.  How many times have you practiced those little punch shots you probably hit several times a round? 

Your practice sessions should include some short game work and putting as well.  In fact, if you perfect your short game, your scores will improve drastically.  Make practice fun by employing some games to keep practice from becoming boring.  See how many 3 footers you can make in a row.  Go to the chipping area and pick a hole and chip to it until you hole one out.  Challange yourself a bit and your confidence will grow.

The bottom line is you need to plan each practice session.  Determine how much time you have and designate time for each part of the game.  If you know you are going to practice three days in a week, maybe you spend one day on full swing and the other two are for short game and trouble shots.  Mix it up a little. You will be a much more rounded golfer by practicing your weaknesses.  If the 7 iron is your favorite club, it is not necessary to stand there and hit fifty 7 iron shots in a row.

Remember the five P's...Proper Practice Prevents Poor Performance!


Saturday, August 28, 2010

Green Reading Made Easy

Reading a green is like taking a long road trip; you have to use a map to arrive at your destination.
In other words, from your starting point you need to observe all the slopes which will effect the roll of your ball and then plan your route.

I begin the green reading process when I am approaching the green from the cart.  The first thing I look for are drainage areas or low areas around the green. Golf course architects are very good at figuring how the water from a big rainfall would drain off the green.  They will not drain a green into a bunker!  Once I take note of the drainage areas, I look for any slopes which might take precedence over drainage areas.  Again, I do this while I am walking onto the green.  I am just looking at the overall slope of the green when I do this.  Generally speaking, your ball will tend to break to low or drainage areas around a green.

Once I have gathered this information, I need to get more detail.  I will look at the putt from all sides.  This just helps me confirm the break and if the putt is uphill or downhill.  Now that I have the overall picture, I will get about 5-6 paces behind my ball and look down the line of the putt.

I form an imaginary "gate" on the green about half way to the hole.  This gate will be about 3 feet wide and this gives me my first look at the true line I want the ball to roll down.  It is similar to what the hurricane forcasters do.  If a hurricane is in the Gulf of Mexico, they will inform us the hurricane could make landfall anywhere from Houston to South Padre Island.  This is a big path.  As the hurricane gets closer to land, they will better inform us the hurricane is going to make landfall at Corpus Christi. 


In this diagram, the green is breaking right to left.  My ball is on the front part of the green and I formed a gate with red dots about half way to the hole.  The first gate I form in my mind is wide.  If you notice, the lines extended from my ball through the gate posts are well left and right of the hole.  This is just my first look at the putt.  I know the putt breaks to the left, so I am saying to myself if I putt over the right gate post I will miss this putt well right. If I putt over the left gate post, I will miss this putt well left.

In the next diagram, I will narrow the gate and my focus to the correct line.


In this diagram, I narrowed my gate to the yellow dots.  I also added a yellow dot to the right of the hole which is my correct line based on the speed I am going to hit this putt.  For this putt, I am estimating a 2 foot break.  By narrowing my focus I am giving my self an increased chance holing this putt!

Obviously you cannot put dots on the green when you are putting. But I will tell you, when I put targets on the green for my students, they hit their putts much closer to the hole. 

On the greens you are playing, just look for old cups, ball marks or other surface irregularities which will help you form a "gate".

Now that you have narrowed your gate, you are ready to roll your ball through the gate toward the hole.  But, before you make your stroke, you need to let your eyes follow your line from the ball to the hole and then back from the hole to your ball.  You should actually see a curved line following the break of the putt.  Once your eyes return to your ball, make your stroke.  Do not stand there waiting for that magic moment.

PUTT IT! 


In conclusion, I will say this process should not take long and works for putts of all lengths.  While your playing partners are putting you should be performing the prep work.  When it is your turn to putt, be ready!  Practice this process on the putting green before you take it to the course.  All you have to lose is strokes!  Good luck.

Wednesday, August 18, 2010

Impact...the Moment of Truth!

If you look at the golf swings of past playing professionals, they were all a little different.  If you attended a PGA TOUR event in the 1960's you could pick out Gene Littler by his smooth swing.  You could also pick out Miller Barber by his unusual swing and Don January by his unique set up.  Then came the 1970's and you could certainly recognize Johnny Miller, Tom Watson, Jack Nicklaus, and Lee Trevino to just name a few.  But, as different as their swings were, they all got back to impact in very similar positions.  Impact was their "moment of truth".

As we moved into the 1980's and 1990's, golf swings on the PGA TOUR began looking very similar with only a handful of exceptions.  Golf instruction methods were improving due to access to video and other high tech teaching aids.  Players had more access to viewing their swing and seeing how they measured up to their competition.  With the purses growing on the TOUR, players had to find ways to minimize their mistakes.  Missing a shot or two a round would cost them money!  So, they began fine tuning their swings paying attention to every little detail.  I think this "mechanical" thinking produced great looking but very similar looking swings.  But again, they all arrived at impact in similar positions.

If you attend a PGA TOUR event now, I am guessing you could recognize a few faces, but how many swings would you recognize?  You could probably pick out Jim Furyk, J.B. Holmes, and Phil Mickelson (because he is left handed), but if you go up and down the money list, there are many swings you could not put a name to.  Now, there is nothing wrong with perfection, I am just pointing out in the 1960's players tended to play their own game and did not worry about what the next player was doing.  In today's era, players have access to great instruction and they are taking advantage of every opportunity to improve.

The bottom line is, all great players have great impact positions throughout the era's.

As a teacher, I have seen thousands of golf swings.  The one thing which stands out as a difference between an accomplished player and that of a 20+ handicapper is impact.  Many times I will start a pupil at impact, and then work to improve their swing from there.  Once you are at impact there is really only one way to take the club back to top.  And, from impact, there is only one way to get to the finish. 

I use an impact or smash bag to teach the proper impact position.  Here is a picture of David, a student from West Texas I am working with.


Rules for Impact (right-handers)
1. Left arm and club in line
2. Weight moving to left side
3. Right knee moving toward target
4. Head behind ball
5. Braced left leg 
6. Right arm close to side
7. Club face square to target

With a little practice on the smash bag your impact position and ball striking will improve.
Note how similar his position is to that of striking the smash bag.


The bottom line is a great impact position will get you compressing your golf ball.  The benefits for iron shots will be striking the ball first then taking a divot which means more solid contact.  For the driver it means you will hit it farther and straighter!

Saturday, August 7, 2010

Swing Thoughts...How Many do you Have?

Now that everyone has had time to enjoy watching the video of Fred Astaire dancing and hitting golf balls in the previous post, I have several questions to pose:

a. How many swing thoughts do you think he had while hitting golf balls?
b. Did he have a pre-shot routine that took over 15 seconds?
c. Do you think he was worried about the result of any the shots?
d. How tight do you think he was gripping the club?
e. Do you think he had a score (and I don't mean musical) in mind?
f. Was he thinking about his dance steps?

I think you can see where I am going with these questions.  Obviously he made dancing look really easy, but he made golf look really easy as well!  Being the great dancer he was, I think he was just letting his body react to the music and golf just happened to be one of his dance steps included in his routine.  Every step just blended together and was graceful to watch.  The key here is he was "reacting" and not "thinking" during this routine.

Now, how do you think the routine would have looked if he had all these thoughts?


I am just guessing, but I do not think the routine would have been near as much fun to watch.  Do you feel like this could be your list of swing thoughts? 

Let's look at how he signed his name.
His signature is free flowing just like his dancing which indicates he was holding the pen very lightly.  Again, he was not thinking about making the letters, just putting the pen to the paper and letting it happen.

Swing thoughts are fine on the practice tee.  But, once you get to the course, you have to dance to the music.
It is not the time to be thinking about your swing or results.  Do you want to play golf, or play golf swing? 

Instead of swing thoughts, try swing "feels".  In other words, try to feel smooth and easy, as opposed to thinking "don't swing hard".  I am sure Mr. Astaire spent countless hours rehearsing his steps, but when it was show time, he quit counting steps and danced to the music.

During your next practice session, I want you to sing a phrase of your favorite song to yourself while you are swinging.  Not out loud, just to yourself.  What this will do is quiet that little voice in your head that is spewing all the swing thoughts.  Nick Faldo once said he would bite the end of his tongue to keep that little man from talking in his head.   Once you are comfortable on the practice tee with this process, take it to the course.  I think you will be suprised at the results and your swing will be much smoother.

Saturday, July 31, 2010

Develop Great Rhythm and Balance in Your Golf Swing

After watching this video of Fred Astaire, I think you will understand the importance of rhythm and balance in the golf swing. Enjoy!


Wednesday, July 21, 2010

Escaping Thick Rough Around the Green


One of the most difficult shots we face is hitting out of thick Bermuda rough around the green. The technique I am going to show you will work well when the ball is sitting deep or at the bottom of the rough.


I recommend using your most lofted sand wedge for this shot (57-60 degree loft).


Set up: Grip down to the bottom of the grip, play the ball about 3-4 inches behind your back foot, put about 70% of your weight on the front foot, close the club face slightly and make sure your hands are ahead of the ball. Note in the picture the yellow line extending from the ball to the outside of my front hip indicating my hands are ahead of the ball.


Backswing: Feel as though you pick the club almost straight up from the ball. There is no "sweep" in the backswing. Note the angle formed by my right wrist and club indicating I did not take the club back low as you would for a typical chip shot. The length of the backswing will determine how far the ball will fly. This shot will come out low and "run" to the target.


Impact: It is very important to strike the ball first. With the up and down motion of the backswing there will not be much follow through if any at all. Note at impact my hands are ahead of the ball just as they were at set up.


With just a little practice you will get the feel of hitting the ball first. Also, you will learn how much backswing is needed to get the ball out of the rough and on to the green. Keep in mind the ball will "pop" out of the rough with very little spin and roll most of the way to the target.