Google+
Rip One Golf- Golf Instruction, Golf Coaching, Golf Classes and Golf Lessons in Austin, TX

Garry Rippy Golf offers golf lessons, golf coaching, golf instruction, golf classes and golf schools in Austin, TX. This blog contains golf instruction articles, golf tips and golf instruction videos by Garry Rippy, PGA.

Wednesday, April 27, 2011

The Good, the Bad...the Ugly!

How many times have you had a great front nine score and then turn around and play terrible on the back?  Or, you hit a great shot and then hit the next one like you have never played golf?  We have all done this from time to time and it can be frustrating.  What happened?

In golf, you just cannot predict what score you will shoot, nor do you want to.  The worst thing you can do is step up on a short hole and think you are going to make a birdie.  This means you are thinking too much about the result or the future and not enough about the process of hitting your shot to the desired target.
This lack of attention to the shot at hand causes the cycle of inconsistency to begin in my opinion. 

Remember, there are NO GUARANTEES in golf.  If you play most of your golf at your home course, it is easy to get complacent in your focus.  Before you know it, you are just going through the motions and the bad and ugly starts happening.

The best way to gain control of your game is to improve your thought process (target selection, pre-shot routine), course management (club selection, aim) and emotions.  When stepping up to any shot, your focus should be on the process of hitting the shot and not the outcome.  It is OK to acknowledge any hazards lurking in the distance, then block them out and focus on your TARGET!
My target is the sand dune between me and the fairway.
Your course management or strategy for the shot will be determined largely by your current ability.  In other words, if you cannot carry the bunker that is 210 yards off the tee, then your target and club selection will need to be adjusted to get you safely in the fairway.  If there is a water hazard or deep bunker on the right side of the green, then your target should be on the left side.

Once you have your target identified, you must block out all other obstacles and play from point A to point B with no mental interference.  You must not have a score in mind when you play a shot.  Stay in the present and make the best swing you can make. 
Eliminate the interference and play from point A to point B.

Do not let your emotions ruin your game.  If you happen to miss your target and end up in a hazard, you must remain positive and go through your routine for the next shot.  The worst thing to do is follow a bad shot with another bad shot caused by rushing and not thinking the shot through clearly.  Remember, each shot deserves to be hit with the same focus and attention regardless of the prior result. 

You can develop this focus on the practice tee by always choosing a specific target for each shot you hit. I find it helpful to imagine hazards on the practice range you have to avoid.  Strive to improve your quality of practice and not necessarily the quantity of balls you hit when practicing. 

Build good practice habits, follow your routine on the course for each shot and you will be on your way to the Good, and not the Bad or Ugly!

Wednesday, April 6, 2011

Playing Successfully in the Wind

March came in like a lion and is still roaring!  It seems the winds have been blowing 15-20 mph this entire spring. 

Here are a few general rules for taming the wind.

When playing in the wind, and any inclement weather for that matter, you will tend to do things much quicker than normal.  So, the first rule when playing in the wind is to slow down!  Avoid the tendency to rush through your pre-shot routine by slowing down all of your movements prior to hitting your shot.  This will help set the tone for a slower and smoother swing.  You also want to avoid swinging too hard in the wind.  The old adage "swing easy when it's breezy" is still in vogue.  I recommend thinking about the pace of your arms when you swing.  Try to feel the arms swinging back and through at the same pace.  Using a speed scale of 1 to 5, with 1 being slow and 5 being fast, try to swing back and through at a 3.  This will help your balance and ball striking and this pace is maintained whether you are headed into or down wind.

The second rule is to grip down the shaft when it is windy.  This adjustment tends to make the shaft play stiffer and helps keep the ball flight lower.  In conjuction with gripping down the shaft, I suggest playing the ball a little further back in your stance.  For an iron or hybrid, I would move the ball position about two inches behind the center of your stance and for a wood, move it back about two to three inches inside your front heel. 

The third rule is to adjust your aim to allow for the wind.  I will say a well struck shot will hold it's line in the wind for the most part.  But, if you already tend to move the ball one way or the other, then plan for it to move more than normal.  When the wind is swirling and you are having difficulty figuring out which way it is blowing, try looking up at the clouds.  Their movement will tell you which way the wind is truly blowing.  If it is a clear day, look at the tree tops and see which way they are moving.

On a windy day you can throw out the yardage book and GPS unit.  Strive for a smooth swing and solid contact.  If it means hitting a 6 iron instead of an 8 iron, then so be it.  Again, it's not how hard you hit the ball, but how solid you hit it.  Typically if you swing too hard the ball will "balloon" or go way too high.

The bottom line for playing successful wind shots is to grip down, slow down, and swing smoothly.

Good luck, calmer days are ahead.

Friday, March 25, 2011

How to Hit the High, Soft Pitch Shot Around the Green

The high, soft pitch shot is very useful when you have to carry a bunker or swale around a green.  This shot does take practice but I will share with you some keys to work on.  The swing I am making is for a 20 yard carry.  I will use my most lofted wedge for this shot (58-60 degrees).  You do not have to open the face for this shot.  With the correct wedge and technique you will have plenty of elevation on the shot.

                                                    
Set Up- Your stance should be about shoulder width apart with the ball positioned between center and the inside of your front foot.  Your feet will be square to your target but angled slightly toward the target.  Open your hips slightly and this adjustment in combination with the right foot turned inward will prevent a sway and help you bring the club back to the bottom of the ball.  Your hands will be positioned slightly ahead of the ball.
Note the letter "L" formed between my left arm and club
Backswing- The swing starts with the arms and then the hands will hinge upwards.  The hinging action helps to flight the ball higher.  The motion should be smooth from start to finish.  With a little practice you will feel how much swing is needed to carry the ball the correct distance.  Keep in mind the swing shown is used from 20 yards and closer to the green.  As you move further away there will be more arm, shoulder and foot movement.


Finish- The length of the finish should closely match the length of the backswing.  In other words, the club does not stop right after impact as it does for a pitch and run shot.  Let the momentum carry you to the finish.  Since this was a 20 yard pitch, my right heel does not leave the ground.  As the shot gets longer, there will be more of a weight shift on the follow through.
At impact, the goal is to strike the ball and turf at the same time.  

My recommendation is to find your baseline swing for a 20 yard carry.  Once you get this feel, then you will be able to alter the length of the swing to vary the carry distance.  The firmness of the greens and slope will determine how much roll you will have after landing on the green.  You will need to pay attention to this detail when you practice.  Also keep in mind a four piece golf ball will stop more quickly than a two piece.
I teach this shot and many more in my short game series instruction program. 

Thursday, March 17, 2011

The Pitch and Run

If you go back a few posts and review my post on chipping, you will discover I feel the chip swing is always the same length.  When chipping, I always try to land the ball just onto the green and let the ball run to the hole.  The loft of the club you are using to chip with will determine how much roll you will have.


With this thought in mind, you will chip the ball when you are within one to four yards from the edge of the green.  If you get in the zone from five to ten yards from the green this presents an opportunity to pitch and run the ball to the hole.  When you are in this zone, it is difficult to make your chip swing and get the ball to land on the green. 

Now, there are times when you may chip and run the ball; for instance, if the hole is cut very close to the edge of the green and you are in the five to ten yard zone, you may chip the ball through the fringe.  We will discuss this in a later post.

Back to the pitch and run.

For the pitch and run you will use your wedges (50 - 60 degree loft).  The more run you need, the less loft you will use.


The set up for the pitch and run is just like that of a chip shot.  Note the ball position is located off my right big toe.  My hands are located on the crease of my pants.  This set up keeps the flight of the ball low and encourages more roll after landing on the green.


My goal when hitting the pitch and run is to land the ball approximately two paces onto the green.  This provides me a little margin for error.  If I miss my target by a pace, I will still end up with a pretty good result.

The pitch and run backswing is similar to a chip swing except you add just a bit of wrist hinge.  You can see
my hands travel just past my right leg and the club is parallel to the ground.


The follow through for the pitch and run is like that of a chip shot.  Note how the shaft and my left arm are in alignment.  This finish will produce a low flight and more roll out.


I always strike the ball first and then the turf when hitting a chip shot and the pitch and run.  I find it helpful to take a practice swing before executing the shot just to get a feel for the turf.

I will discuss the high, soft pitch shot in the next post.


Saturday, February 19, 2011

Great Putting Drill to Help you make a Smooth Stroke!

If you are having difficulty controlling your distance on the putting green, you probably have a little too much "hit" in your stroke.  This can be especially true if you are putting on overseeded greens.  When the greens get slow, you feel you have to pound the ball to get it to the hole.  Then, when you go play a course where the greens are not overseeded, you hit every putt way too hard!

If this sounds familiar, I have a great drill for you to try.

To get the feel of a proper putting stroke, I would like for you to simply take some practice putting strokes with your eyes closed.  Since there is no ball in front of you, there will be no urge to "hit" the ball.  You will feel a flowing stroke absent of tension.  Pay particular attention to your follow through.  There should not be a sudden "stop" at the end of the stroke.  Just think "back and through".

Now, find a level putt of about 20' in length on the putting green.  Take your set up, look at the hole for at least three seconds, look back at the ball, close your eyes and putt (don't open your eyes until the ball is well on it's way to the hole).  You may be suprised as to how close you will come to making the putt, even with your eyes closed!  By looking at the hole for three seconds, you are allowing your brain and eyes to calibrate the amount of stroke needed to get the ball to the hole.

Another way to do this drill involes the use of a friend.  Again, find a level 20' putt.  Take your set up, close your eyes and start making continuous practice strokes.  The strokes should match the distance you are trying to hit the putt.  As you are making these strokes your friend will place a ball in the way of the putter.  You will not know when a ball is going to placed in front of you.  I suggest making about 10-15 continuous strokes and your friend may or may not put a ball in front of you on every practice stroke.  The point is you will not know when a ball is going to be there, so your stroke will become very smooth and even. 

After perfoming these drills for a few minutes return to putting with your eyes open.  Focus on these areas the remainder of your putting practice:

1.  Always look at the hole for at least three seconds before you putt. 
2.  As you are standing next to your ball, make a practice stroke while looking at the hole.
3.  As you make your stroke, it should feel more even...remember "back and through".  No sudden stop at the end of the stroke. 
4. LET THE BALL BE WELL ON IT'S WAY TO THE HOLE BEFORE LOOKING UP!

Good Putting!!!

Tuesday, January 11, 2011

Finish in Balance to Improve your Swing

Finish with the 7 iron
Does your finish really make a difference?  You bet it does! How many times have you lost your balance in your swing and hit a great shot?  Not many times I am guessing!

You should be able to maintain your finish position after the ball has long left the club face.  If you are out of balance then you are either swinging out of control or you are out of position at some point during the swing.

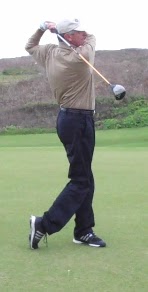
The finish I made in the picture to the left is with a 7 iron.  There are three key positions to look for in your finish with all full swings(right handers):

1.  Your left leg should be straight and supporting the majority of your weight with your right foot released from the ground positioned on your right tip toe.

2.  Your torso and right knee should be facing the target.

3.  The shaft should be about neck high with your right shoulder closer to the target than the left shoulder.

For my students struggling to get to this finish I will have them perform "front end" therapy.  Front end therapy is a name for a  four step drill I use to get them to focus and feel the proper finish.  The drill works like this:

1.  Without a ball, take your 7 iron and get into your golf posture with the club soled on the ground.
2.  Now, without taking a backswing, swing to the finish and strive to copy the finish in the above picture.

You may have a little trouble at first getting into the correct, balanced finish, but after several repititions you will get the hang of it.  The second step of this drill follows:

1.  Tee up a ball about 1/2" high.
2.  Take your 7 iron and get into your golf posture.
3.  For this step you are allowed to take a very small backswing (about a foot long) and then as you move through the ball to your finish you will clip the ball from the tee and it will travel about 10 yards.  The goal is to keep the effort level down while focusing on the finish.

Step three of this drill allows you to take a 1/2 backswing to the finish and then step four allows you to take a full swing and go to your finish.   At step three the ball may travel about 50 yards and at step four the ball may travel around 100 yards.  Again, we are looking for the effort level to be slow and smooth while finishing in balance.  I will have the student hit about 10-15 balls at each step of the drill.  What I have found is by focusing on the correct finish, any backswing issues there may have been tend to take care of themselves.

After performing all four steps of this drill, you are ready to hit full shots, but remember, the goal is to finish in balance and the correct position!

You may ask is the finish the same for every full swing?  The answer is yes!


Look how similar the finish on the left with the driver is to the finish on the right with the pitching wedge.  Now compare them to the finish with the 7 iron.


Now take a look at this driver swing from down the line.  Note how you can see the entire bottom of my right shoe.  I am definitely on my left side and in balance.


To summarize, I think you will discover a tempo or pace for your swing which allows you to move to your finish easily.   Finishing in balance is a habit you can perfect with a little practice!

Tuesday, November 2, 2010

Reach Your Full Potential with a Great Set Up!

What is the number one thing you can do today to improve your golf score?  Some would say "play or practice more" and others might say "hit it farther or straighter".  Both are great answers, but the truth is, the best thing you can do right now to lower your score is improve your set up!

If you look at any tour caliber player (male or female) you will notice they all look very similar in the set up position.  It's almost like they all read Golf 101 "The Set up".  But, as an instructor, a poor set up is the #1 issue I see among the majority of amateur players. 

A great set up will allow you to reach your full potential as a golfer!

To me, the proper set up is easy.  Follow these instructions to get the "feel" of an athletic set up:
1.  Without a club, I want you to stand erect with your feet shoulder width apart.
2.  Now raise your arms about shoulder height and place the palms of each hand together with the thumbs pointed up.  You have formed a triangle between the arms and shoulders.
3.  The goal is to now get the arms or triangle to hang in front of you.  To accomplish this first lower the arms until your chest stops them.  To get them to hang in front of you, bend from your hips as you let your shoulders drop forward.  Try to maintain a fairly straight but not stiff back as you do this.  When the arms are hanging straight down from your shoulders, this is where you stop.
4. Now put a small amount of bend in the knees, relax the arms and put your hands in a golf grip position.
5.  Your weight should be balanced left to right and back to front. 

After repeating this exercise a few times, have a club nearby and place it in your hands after completing the last step.  It won't be long until you can get in this athletic position every time with a club in your hands.


Here is a front view of the proper set up.  One thing to note is the position of the right knee.  Even though I am balanced, I do put a little pressure on the inside of the right foot to keep me centered over the ball on the backswing.  This move also allows me to turn and not sway on the backswing.  I do this by positioning my right knee about 3-4 inches inside my right foot.  Also, it is plain to see the "triangle" formed by my arms and shoulders. 


From a down the line look, it is plain to see my arms hanging from my shoulders.  Also, my head is in line with my spine and my chin is not buried in my chest.  My knees have a slight bend to them and they are just above my shoelaces.  It is not a coincidence the club is setting at 90 degrees to my spine.  If my hands were too high at address or above the green line, this would cause too much tightness in the wrists and prevent me from hinging my wrists properly at the top of the swing. 


I recommend to check your set up position in front of a full length mirror.  Once you associate the correct feel with the correct look, you will be able to duplicate your set up on the course.
Let's briefly look at how a good set up effects the swing.

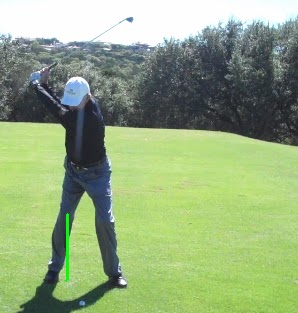
A great set up allows me to turn to the top and maintain my original spine angle.

Note how my right knee stays braced, yet my hips have turned in the backswing.
This position produces power and accuracy!


At impact I have retained my original spine angle.  Since I turned
into the brace of my right leg, it is easy to get off my right side and onto my left through impact.
This is evident by the right heel releasing from the ground through the hitting area.