
Garry Rippy Golf offers golf lessons, golf coaching, golf instruction, golf classes and golf schools in Austin, TX. This blog contains golf instruction articles, golf tips and golf instruction videos by Garry Rippy, PGA.
Friday, August 23, 2013
Learn to Finish your Golf Swing in Balance with Proper Footwork
These are two simple drills which will help you finish your golf swing in great balance. Make sure your are swinging smoothly from backswing to downswing. Any sudden shift of power will disrupt your foot work!
Tuesday, August 20, 2013
No Standing Ovation for this Swing!
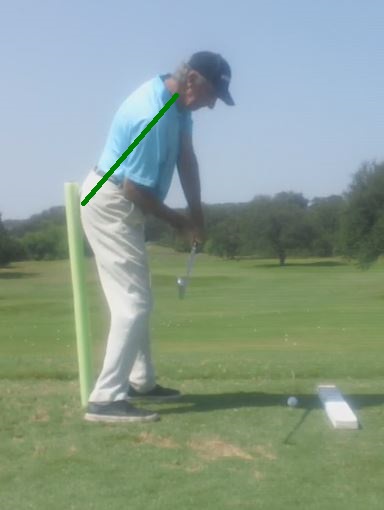
If you are consistently hitting the ball thin (not taking a divot with irons) and to the right of your target, then you may be "standing up" in the downswing. In other words, you have not maintained the posture needed to compress the golf ball. In the picture below, the body is too upright and the club is trailing too far behind the body. The hips have been thrust toward the golf ball instead of rotating as they should. From this position it will be difficult to square the club face by impact and my club is destined to hit the 2x4 on the ground I have used for alignment...OUCH!

The correct position would look like the picture below. Note how my spine has more angle than the above picture. The golf club is in a much better position to deliver the ball to the target. This is due to my hips staying in position and not moving closer to the ball as they have in the picture above. The hips are rotating as they should and this will be evident in my finish. My club is now traveling down the target line.

Try this drill is you are hitting shots as described above.
 Set up with a 7 iron and place a guide in the ground touching your backside. Here I have used an old shaft inside a foam noodle. An alignment rod would work as well. Make sure you copy the above set up. My shoulders are over my toes and my arms are hanging very relaxed from my shoulders.
 On the backswing, try to keep in contact with the guide, but more importantly, on the downswing, you want to remain in contact as well.
If the hips rotate properly, your finish will look like this. Once I have made impact, the hips complete their rotation and I finish tall with my hips square to the target.


Try this drill is you are hitting shots as described above.


|
| Correct downswing! |

Thursday, August 15, 2013
Let's Find you More Clubhead Speed!
While stretching is very good for your golf swing, I also like to use these training aids to help you find more clubhead speed. I recommend doing a little work with these training aids daily to help you find more flexibility and balance in your golf swing.
Wednesday, May 15, 2013
Backswing Drill to get you on the Correct Circle
I like to think of the backswing as a "tilted" circle. The angle of this circle would be considered the "plane" of the backswing. A plane which is too steep or too shallow will cause ball contact and directional issues. This is a great drill to help you feel and develop a proper backswing.
Work on small shots with a lofted club such as a 9 iron. Give yourself some room so you do not hit the alignment rod which is set at an angle. I recommend placing the rod at least two feet behind your golf ball and set at the same angle as the shaft at address.
Work on small shots with a lofted club such as a 9 iron. Give yourself some room so you do not hit the alignment rod which is set at an angle. I recommend placing the rod at least two feet behind your golf ball and set at the same angle as the shaft at address.
Monday, April 1, 2013
Pitch and Run Shots from 20 Yards and In
The "pitch and run" shot is a very useful and safe shot to hit. This shot can be hit when the landing area is fairly flat and you have room for the ball to run once it is on the green. Typically, I will hit this type of shot when my ball is anywhere from 5-15 yards from the edge of the green AND I have 10-15 yards of roll out room. In this video I am using my lofted wedges, but if there is enough green for the ball to run out, I may use as little as an 8 iron for the shot. If at all possible, I will use the "pitch and run" method as it requires less swing and eliminates errors caused by making a bigger swing.
Here are some stop action photos of the pitch and run. Note how the swing (and my hands) stay low on the backswing and finish.


Friday, March 8, 2013
Drill for Improved Pitch Shots
In an earlier post (Oct. 30, 2012), I discussed and provided pictures of this drill to help you hit more solid pitch shots. This video just serves as reinforcement of the importance of a good impact position!
Saturday, February 16, 2013
Add Freedom of Motion for "Crisper Chips"
Most of us try to be too perfect with our chipping stroke. We have all been instructed to lead with the hands, but this advice can lead to extreme tightness in the hands and wrists. The resulting tension causes inconsistent shots!
Instead, I want you to think about how your body releases through the chipping stroke. In this video I explain and demonstrate a way to develop freedom of motion in the chipping stroke.
I like my chips to be "crispy" please!
Instead, I want you to think about how your body releases through the chipping stroke. In this video I explain and demonstrate a way to develop freedom of motion in the chipping stroke.
I like my chips to be "crispy" please!
Point your way to more Accurate Iron Shots
This is an easy drill to perform and it will really help you hit your irons more accurate.
Use a 9 iron and only hit the ball about 75 yards when doing the drill. This means make a small back swing and keep the effort level down. Note the position of my lower body through impact to the finish. The weight moves to my left side and my right knee is pointing to the target as well. If you stay too "flat" footed with your back foot, you will not hit the ball very solid.
Enjoy!
Use a 9 iron and only hit the ball about 75 yards when doing the drill. This means make a small back swing and keep the effort level down. Note the position of my lower body through impact to the finish. The weight moves to my left side and my right knee is pointing to the target as well. If you stay too "flat" footed with your back foot, you will not hit the ball very solid.
Wednesday, January 16, 2013
Is Your Swing a Pain in the Glass??
A picture and a sound is worth a thousand words!! OUCH!!

As you can see, the club has stayed outside my hands to this point. If I come across the board too early, the club would be behind my legs and poised to strike the glass. At this point in the backswing my body begins to rotate as I add a little wrist hinge as pictured below.


The third drill you can do in the house. Take your set up (use a short iron) with your back side about a foot or so away from a wall. I find a hallway works really well and imagine the wall as the glass. Practice taking some small backswings and obviously DO NOT HIT THE WALL on the backswing.
Performing any or a combination of these drills will help you get the feel of a great backswing. You will know when you are doing it correctly because your ball striking and direction control will improve immensely. We want to eliminate compensations in the golf swing and a great backswing accomplishes this!
 |
| BANG!...This back swing is too horizontal causing the club to strike the glass! |
The proper golf swing should be a blend of horizontal (body rotation) and vertical (wrist hinge). In the swing above, the club has way too much horizontal on the backswing and slammed into the glass. In other words the backswing was too shallow without enough vertical. In the take away, the club moved too much to the inside of the target line because I added a wrist roll instead of a wrist hinge. At this point in the back swing, the club should be working more vertical or "up" the glass as opposed to "into" the glass. This faulty backswing can cause a multitude of issues. If no manipulations are made to correct the mistake, the ball will usually go to the right (with a possible shank) and it would be hit very thin (no divot).
Now, if the club is swung too upright like a Ferris wheel, this would be considered too vertical. In this swing, there is definitely quite a bit of lifting of the arms going on. This backswing is way too vertical with little or no body rotation. Your divots are going to be very deep with this backswing and you would typically pull the ball to left field.
 | |||||
| This back swing is too vertical...note how high the right elbow is. |
We are looking for a backswing somewhere in the middle of these two as pictured below.
 |
| The perfect blend puts you in a powerful position at the top! |
I use three really good drills (use a short iron for these drills) to help position the backswing on the correct plane. In the first drill, I place a 3 foot long 2x4 about 3 inches inside the target line as a guide. If the board scares you, then use an alignment rod or rolled up towel instead. The ball is placed toward the front of the board so you won't strike the back of the board or the front of the board on the downswing through impact. The goal is to swing the club back along the board without the club coming across the board too early.


My club is more vertical in this picture compared to the picture at the top of the page. I will hit several shots making small swings so I can avoid the board on the back swing and forward swing. Tee the ball up so you can stay in the same spot without moving the board each time.


The second drill I use is place a foam noodle (over a shaft) in the ground as pictured below. The angle of the noodle is set the same as the angle of my shaft at address. If I take the club too far to the inside on the backswing I will hit the noodle.
My goal is to make
the angle of my club the same as that of the noodle when I am at the
halfway point in the backswing. This will happen is I get the correct blend of body rotation and wrist hinge. I recommend hitting quite a few shots
using small swings so you will not hit the noodle either on the backswing or the forward swing.


Performing any or a combination of these drills will help you get the feel of a great backswing. You will know when you are doing it correctly because your ball striking and direction control will improve immensely. We want to eliminate compensations in the golf swing and a great backswing accomplishes this!
Tuesday, January 8, 2013
Get a Grip!!
The grip has an effect on your set up position, club path, club face position, distance and loft of your shots. A correct grip will eliminate compensations you may be making in your golf swing. For this reason I think it is important to take a serious look at your grip while we are in the off season. To make a grip change you will need to be patient and plan on many repetitions on the practice tee. The payoff is once you get a good grip it will usually stay that way for a long period of time.
In the 47 years I have been playing golf, I have only made two major position changes in my grip. When I was in high school, my grip was very strong on the club. My left hand was turned way too far to the right on the club and of course this caused my right hand to be turned too far under the grip (see picture below). When I looked down at my grip I could see all the knuckles on my left hand and most of my fingers on the right hand. This grip position will lead to hooking the ball, and that is exactly what I did!
Once I got in the golf business and started studying and learning more about the swing, I knew I had to make a grip adjustment so I could keep the ball in play. Plus, when I turned professional I was now playing golf for money. It took some time and practice but I eventually turned my hands in a more neutral position on the club (see picture below). Both hands were turned counter clockwise on the grip so looking down at my grip I now only saw two knuckles on my left hand and only the finger tips of the right hand.
My constant battle fighting the hook was now eliminated. Sure, I could still hit a hook every now and then, but it wasn't a fear every time I took the club back. In fact I was known as a very straight driver of the ball for a long period of time and it was not because of some "major" swing change.
Now I am back to a grip position which allows me to hit the ball
fairly straight. My misses now stay on the "grid" except for the
occasional foul ball to right field. In the picture above note how the right hand is turned too far to the left on the grip. This is a very weak grip position which causes a fade or slice. Remember, when one hand is out of position, the other usually follows too!

 I place the right hand on the club first. This is just my preference but the bottom line is make sure the palm is facing the target if you want a neutral grip. I then place my left hand on the club and slide the right hand into position. I use the overlap grip grip, but you may use the interlock or ten finger position (see picture below).


In the 47 years I have been playing golf, I have only made two major position changes in my grip. When I was in high school, my grip was very strong on the club. My left hand was turned way too far to the right on the club and of course this caused my right hand to be turned too far under the grip (see picture below). When I looked down at my grip I could see all the knuckles on my left hand and most of my fingers on the right hand. This grip position will lead to hooking the ball, and that is exactly what I did!
 |
| Strong grip...causes the ball to draw or hook to the left. |
Once I got in the golf business and started studying and learning more about the swing, I knew I had to make a grip adjustment so I could keep the ball in play. Plus, when I turned professional I was now playing golf for money. It took some time and practice but I eventually turned my hands in a more neutral position on the club (see picture below). Both hands were turned counter clockwise on the grip so looking down at my grip I now only saw two knuckles on my left hand and only the finger tips of the right hand.
 |
| Neutral grip...straight shooter! |
 |
| Exaggerated weak grip. |
I didn't really work on my grip again until about seven years ago when I began playing a higher level of competitive golf. Over a period of years I started placing my hands on the club in a much weaker position. In other words, my hands were now turned too far to the left on the club. When I looked down at my grip I could only see one knuckle on my left hand and three knuckles on my right hand. This grip position will make it very difficult to draw the ball and in fact it will cause you to hit the ball to the right with a fade or even a slice. My issue was my misses were now going to right field so I had to work on the grip one more time. I had to work the hands a bit more clockwise on the grip so I could have a complete arsenal of shots. When you are missing fairways, it makes it difficult to hit greens too. Again, not a good combination when you are trying to make money playing golf.
Let me show you how to place the hands on the club properly. The first thing to do is close the gap between the thumb and forefinger of each hand. If you have space in this crucial place, you will lose control of the club at the top of the swing. If you have worn spots on your glove, then there is some slippage happening and this can be the cause.
 |
| Note the gap between my right thumb and forefinger...not good. You do not want a gap between the left thumb and forefinger either. |
 |
| Close the gaps gently...do not squeeze the thumb too tightly to the forefinger. |

 I place the right hand on the club first. This is just my preference but the bottom line is make sure the palm is facing the target if you want a neutral grip. I then place my left hand on the club and slide the right hand into position. I use the overlap grip grip, but you may use the interlock or ten finger position (see picture below).
After you slide the hands together, the left thumb will fit into the lifeline of the right hand. The hands are now tied together like a jigsaw puzzle. The pieces are not jammed together but fit comfortably together.
I prefer a light grip pressure. On a scale of 1-10 with 10 being tight, I would be somewhere in the 3-4 range. A light grip will help you swing the club faster!
The bottom line is once you get a good grip, your set up will be in balance and it will be easier to align properly to your target! If you need to make a grip change I recommend keeping a club by the couch so you can practice gripping the club while watching TV. The more repetitions you get in, the quicker it will begin to feel more comfortable to you.


Subscribe to:
Posts (Atom)